One of the first steps to starting your Farmbrite Market Online Store is to create the products you will be selling. You'll need to define what customers can buy, the pricing of those items, and so on. Of course, even after you've done your initial set up of products, you might add additional ones later as well - maybe you're bringing a trendy new product to market, or creating something new with a recent abundant harvest.
Looking to build products with selections and varieties for your customers? Check out this article about Product Variations after reading through this one to learn more about using that feature.
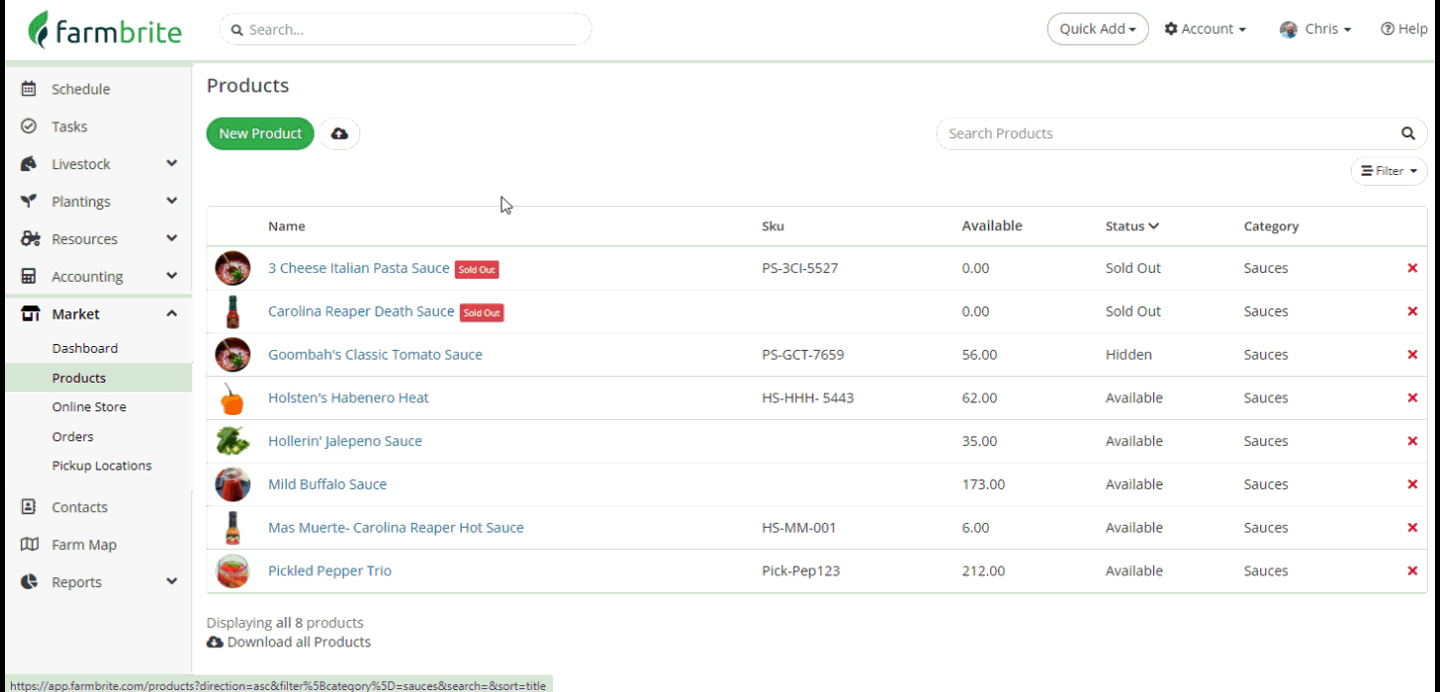
To get started creating a new product, navigate to Market in the left menu, and then choose Products. From the Products Homepage, click the New Product button.
You'll be presented with many options to add information about this product. Each is outlined below. Be aware that the only field required at this point is the Product Name.
Product Name - How do you refer to this product, and what should customers see it named in your online store and in their orders?
SKU - A barcode SKU or Internal ID for this product.
Retail Price - How much does this product cost in your online store, or when sold in small quantities to a customer? You can also enable volume based pricing, letting you set different prices based on the quantity of the ite purchased. Note that a price is required to sell an item, it cannot be added to an order without one. Y
Wholesale Price - How much does this product cost when sold in bulk to a reseller? Note: Wholesale pricing applies to administrative orders only and is not available in the online store. If you only supply a wholesale price and not a retail price, the product will not be displayed in your Online Store.
Product Sold By - In what measurement unit is this product sold - ounces, pounds, tons, bales, bushels, or just "quantity" if it is a packaged product sold by individual units.
Limit Sales Based on Inventory- Check this box to prevent customers from buying this item in your online store if there is not enough inventory left to fulfil their order. If you check this, you'll then have a box to supply the amount you have available for online sales. For more information on that, check out this article.
Listing Category - Your online store is categorized by item type - choose from the preloaded options, or create your own under your Account Settings.
Product Type - If you are selling tangible goods, you'll likely select Product. However, you might select Membership if you're selling a CSA subscription, or Other/Custom if your selling tickets to an event or a class.
Status - List this product as Available, Back Ordered, Sold Out, Draft, or Hidden. Selecting any status other than Available will hide this product from your Online Store. You might use Back Ordered for a product that you expect to get more of soon, while Sold Out is more appropriate if you do not expect to replenish your inventory.
Show in Online Store - Decide if this product should be shown in your online store or not. Even if this is set to Yes, be aware that you must have a retail price set, and a status of Available for the product to be shown.
Tax Behavior - Choose whether or not the price you supplied includes tax. Only shown with Stripe Tax Integration enabled in Online Store Settings. See Adding Taxes to Products for more information.
Tax Category - Select the tax category that should be associated with this product. Only shown with Stripe Tax Integration enabled in Online Store Settings. See Adding Taxes to Products for more information.
Delivery Options - How can this product be delivered - Shipped, Pickup, or Delivery.
Description - Supply a text description of this product to be displayed in your online store.
Additional Instructions - Add text to be appended to your customer's invoice/receipt email when they purchase this product. Great for extra information that is specific to this item, like instructions for a CSA Share pickup.
After you've made your choices and completed the fields, click Save in the bottom right.
Your new product has been added, and you'll see it listed on your Product Homepage. Move on to our next article to learn about editing it to add images or additional details. Also, if you have a lot of products to add, check out our article about Importing Products to save some time!
If you have any questions about adding a product feel free to reach out to us for assistance!