Traceability concerns are important to many agricultural businesses. When you receive a sales order and need to pack it for shipping or delivery, you'll probably want to know exactly what harvest your available inventory came from so you can ensure you pick the correct items for the order. Things like the field, bed, and harvest date are obviously important, and you'll use a unique traceability lot number to track that information for the harvest . In case any product source questions arise in the future, you'll be able to easily know exactly when and where the item was harvested.
You'll find all the steps for this outlined below, or you can watch this video for a full walkthrough as well.
This process consists of several steps which we will outline in detail below. In general, you'll do the following:
- Set up your inventory tracking system to know where you're storing your harvests.
- Harvest your crops and add them to that inventory, assigning them a traceability lot number.
- Create a product order for a new sale.
- Pick the items for the sales order to choose which lot the items came from.
Be aware that steps 2 and 3 steps could be reversed as well. Your operation might receive the order first, and then harvest the crops to fulfill it. Farmbrite can be used either way, the process is flexible and up to you.
Setting Up Your Resources and Inventory
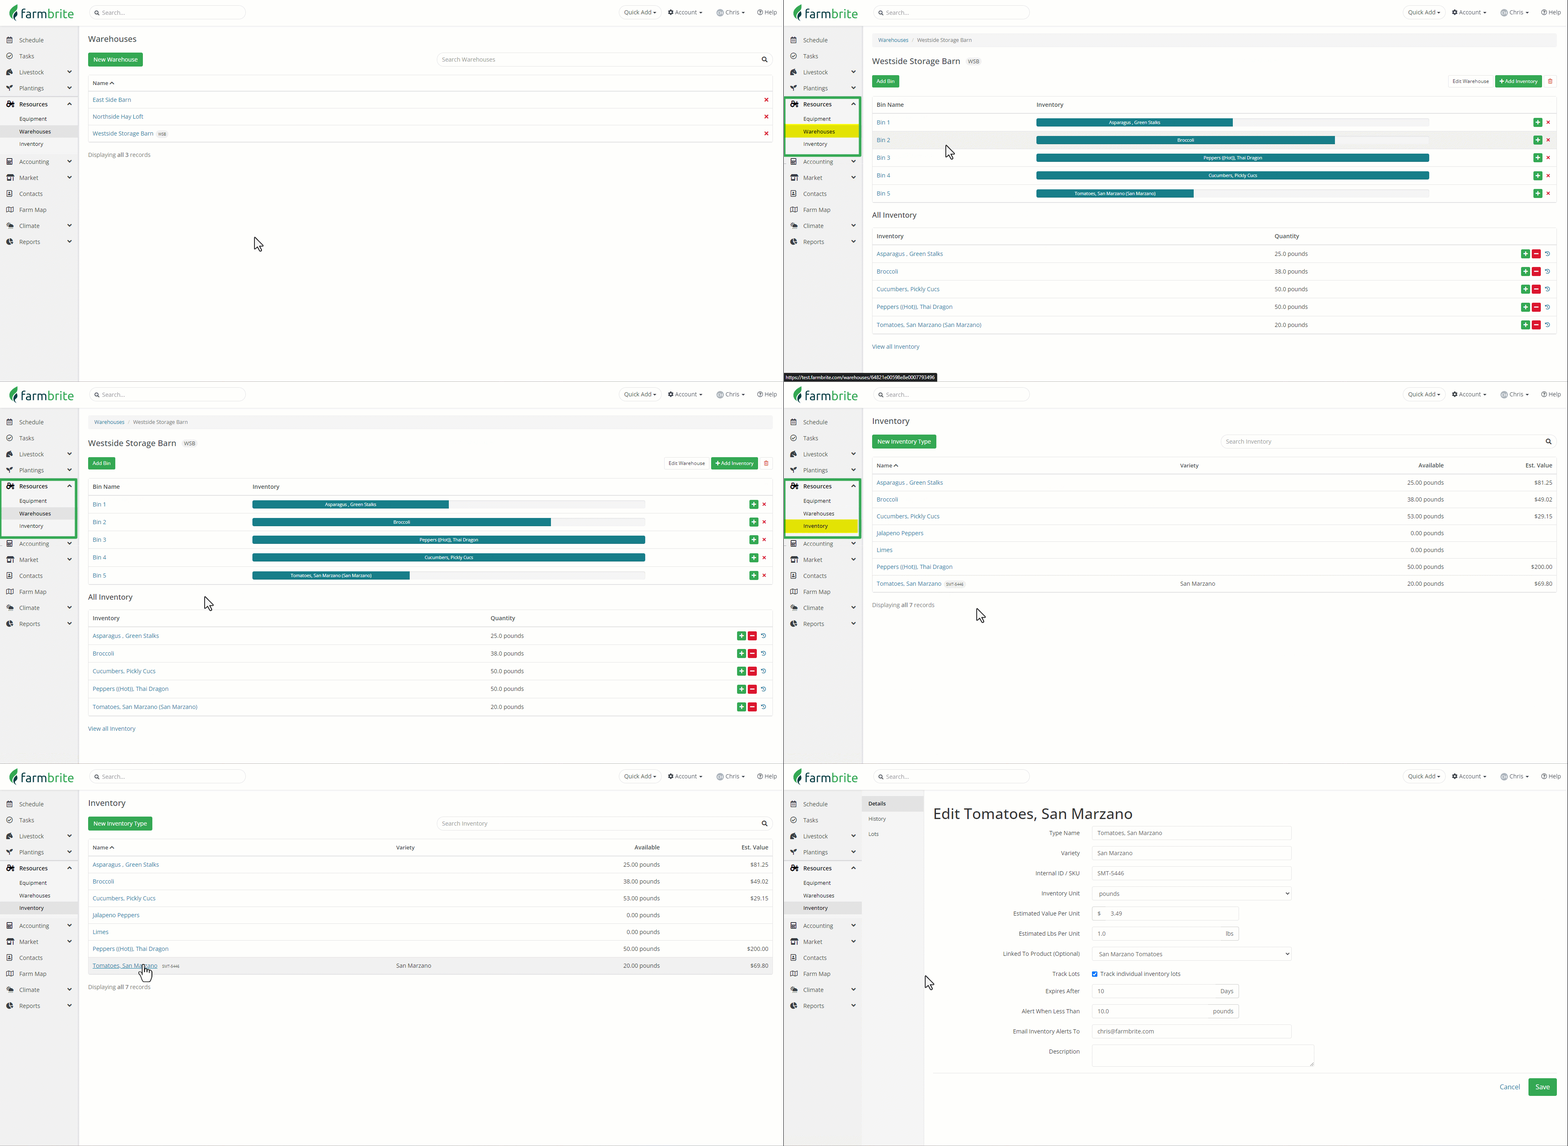
If you haven't configured your Farmbrite Inventory system yet, you'll probably want to check out this Getting Started help article for an overview. You'll need to define where you are going to store your inventory before you harvest it, which might include places like barns, warehouses, and cold storage lockers. These can also be divided into smaller sections, like bins, shelves, and cabinets. You also need to create the inventory items to track, which let you add and remove from the amount on hand as you harvest crops and then pack orders for sales. It's also important to be sure you mark the item as being tracked in lots if you'd like lot numbers added to your harvests. Check out some examples below for warehouses, bins, and inventory items we've set up, and note the "Track Individual Lots" checkbox. It's important to have the configuration in place before you harvest, but it probably won't be part of your day to day operations for this process.

Harvesting and Adding to Inventory
Now that you have the inventory items set up with a place to store them, you can then record a harvest to add the yield to the warehouse or bin. You can watch this quick video to get an overview of the process; the individual steps are outlined below.

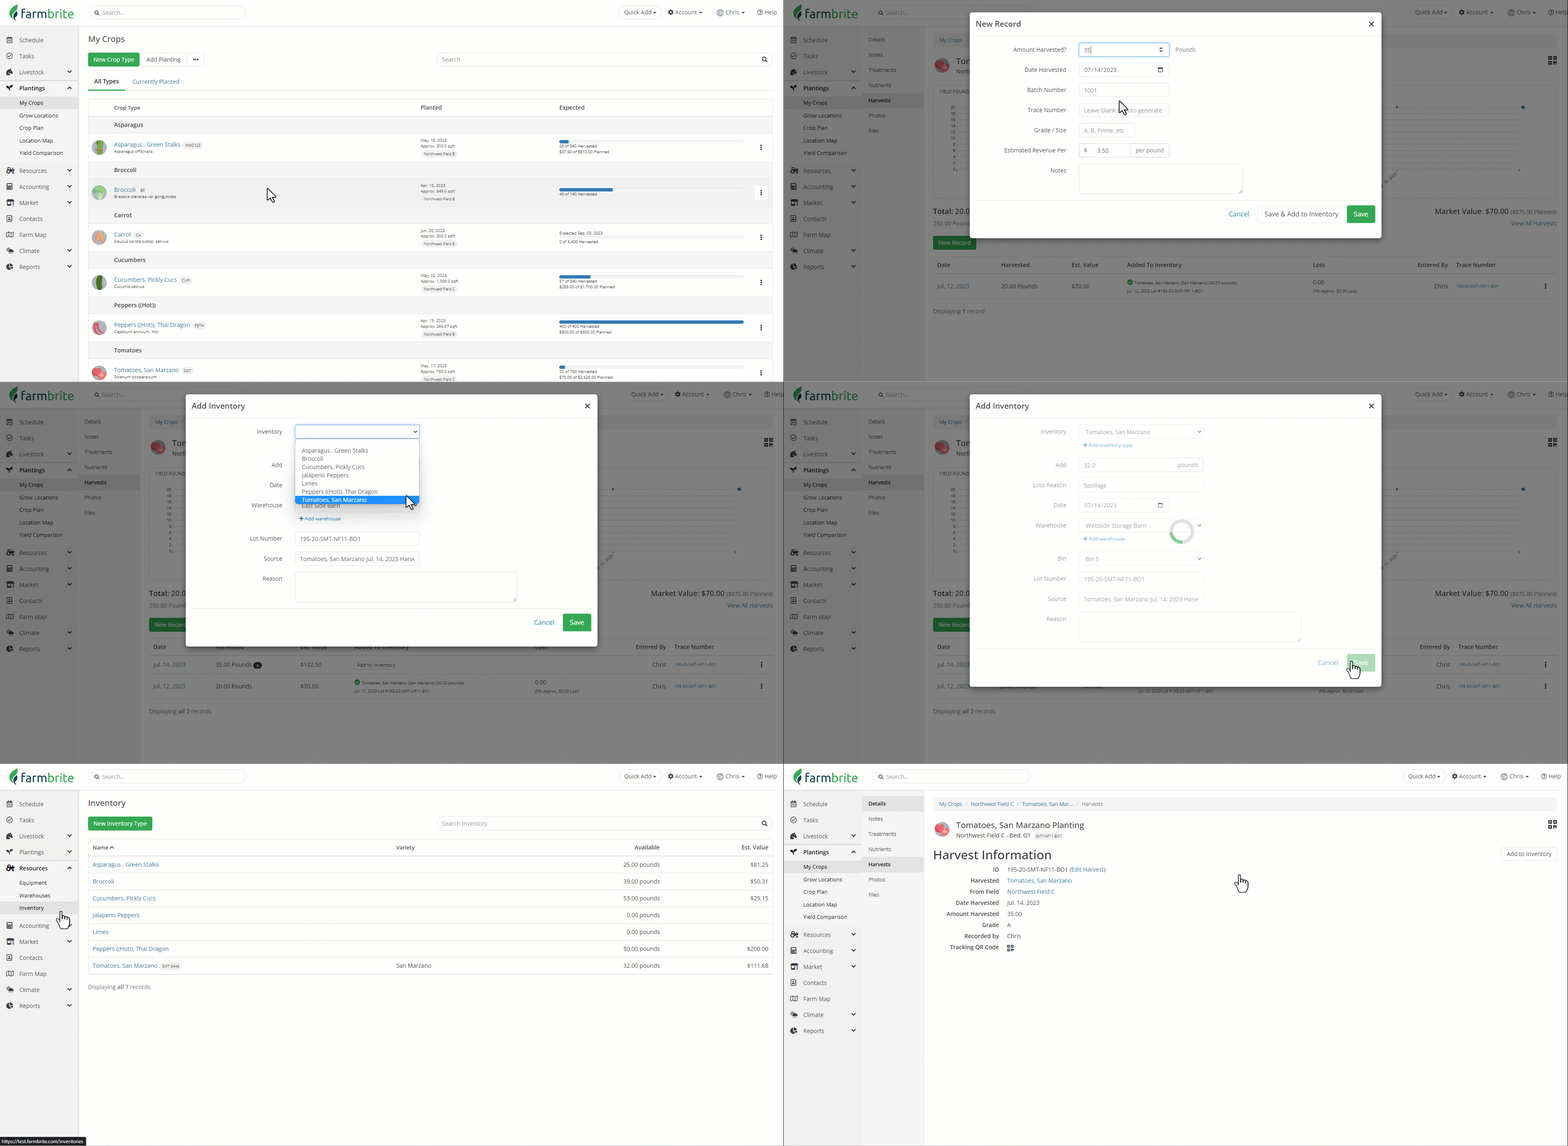
- Navigate to the Plantings section in the left menu.
- Select the crop you want to harvest, and then the specific planting for it.
- Choose New Record and a new window opens.
- Supply the amount and date of the harvest.
- You can optionally specify a Trace Number; it will autogenerate one if you leave this blank. The autogenerated number includes information about the date of the harvest and is encoded with the day and year (e.g 171-23 would be the 171st day of 2023.)
- You can also add a grade, estimated revenue, and a note if needed.
- You can then choose if you want to add the harvest to your inventory right now, or save and add it later.
- Whether you added it immediately, or came back later to do it, in the Add Inventory window:
- Choose the inventory item to link the harvest to.
- Supply the amount you are adding, and the date.
- If there was any loss or spoilage, you can supply a smaller quantity to add to inventory, and Farmbrite will ask for you to supply a reason for the loss.
- Choose if you'd like to update your linked product inventory as well. If you sell this harvested item in your online store, checking this box will increase the amount available for online sales by the amount added to inventory.
- Choose the warehouse and bin the inventory will be added to.
- The Lot Number and Source will be prepopulated with the Trace Number and harvest information for continuity and trackability.
- Save, and the harvest is added to your inventory.
In our example video, we are working with the San Marzano Tomatoes we have planted in Bed 01 of Northwest Field C. Following the steps above, we harvested 35 pounds from that planting, but removed 3 before adding them to inventory due to spoilage loss. Also see how you can select the Trace Number to view information about the harvest, and how the inventory section will connect the Lot back to the Harvest with just a few clicks.
Creating and Picking Sales Orders
With your crops harvested and added to your inventory, you're now ready to add orders and pick them. Here's a quick video, but you'll also have the steps outlined below.

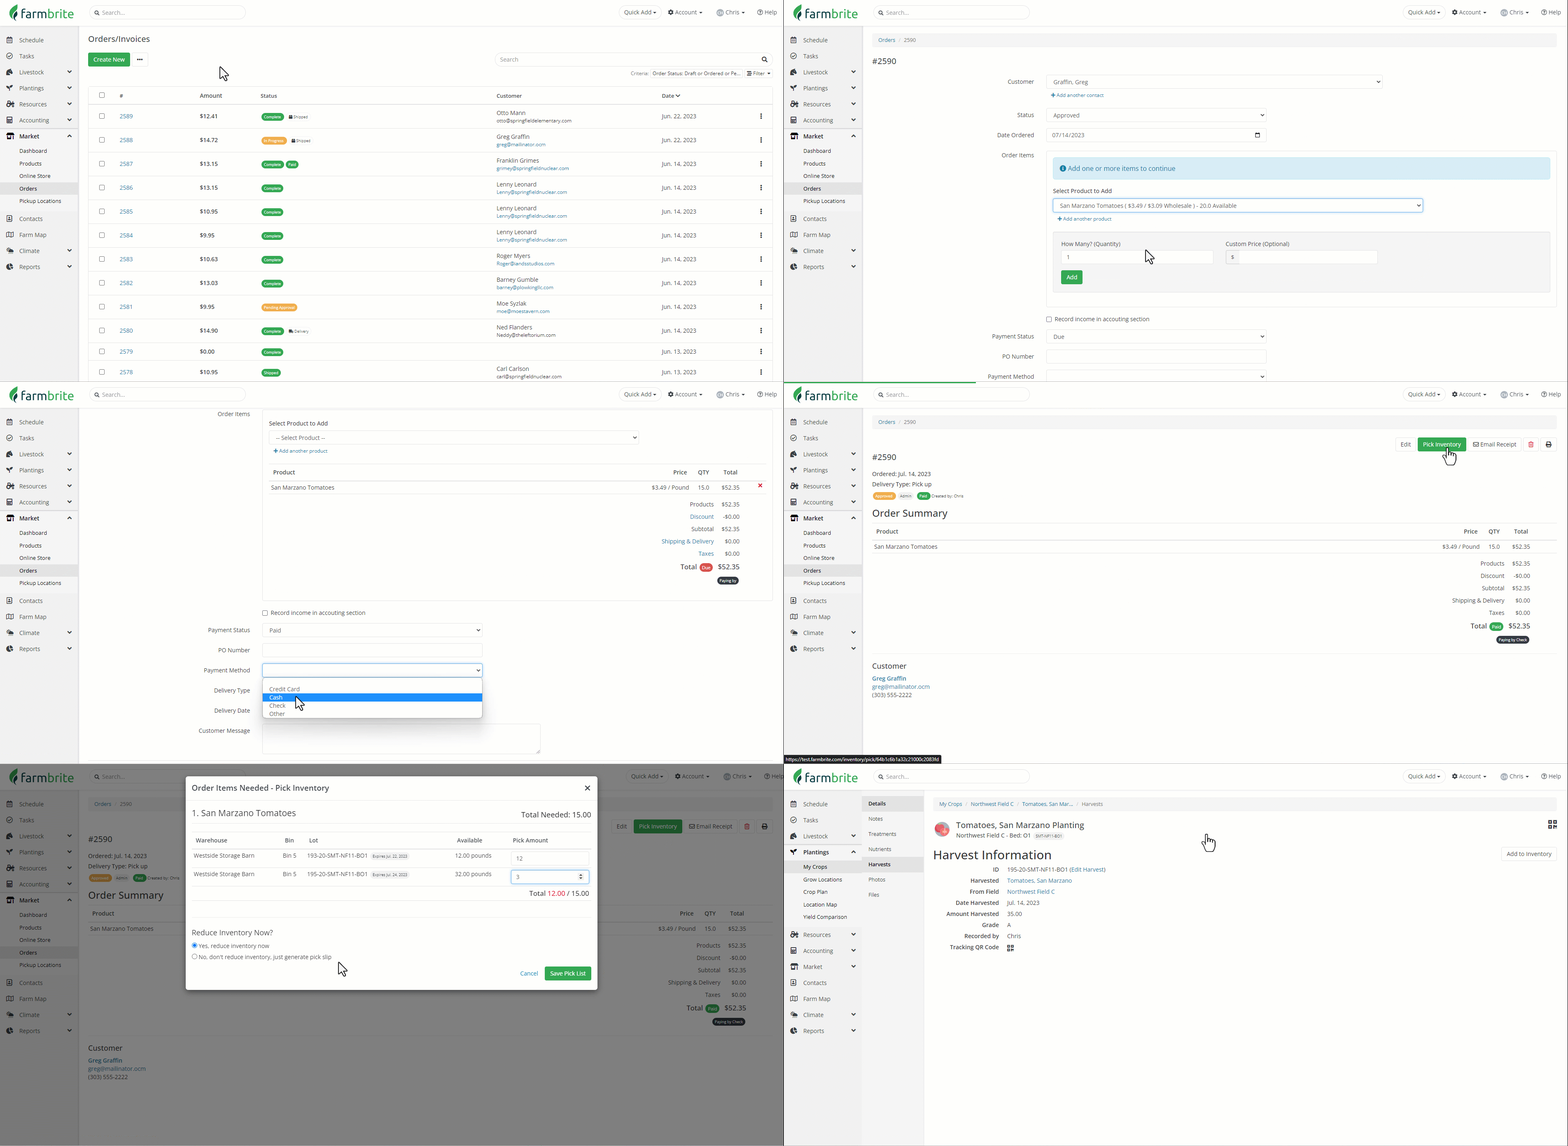
- Navigate to the Market section, and select Orders.
- Select the Create New Button.
- Supply information about the order; who is the customer? What did they buy? What's the status, and have they paid?
- Like your harvest, you'll have the opportunity to work with the inventory now, or save and pick later.
- This could be helpful if you are adding the order first, and then harvesting the crop. You can add the information about the order, then follow the steps in the section above to add the harvest, and then come back here to pick the order from your new harvest inventory.
- When you're ready to pick the order, choose the Pick Inventory button.
- In the new window, you'll find a list of your Inventory, shown by lots, with the quantity remaining in each lot.
- Supply how many you want to use from each lot.
- Select if you'd like to reduce the inventory now, or generate pick list and then reduce the inventory later.
- If you choose to generate the pick list, you could print it and then go pick it, or access this order on a mobile device to save some paper.
- Once picked, you can then Edit the pick list and reduce the inventory for what you took from each lot.
In the example video, we see a 15 pound order for our San Marzano tomatoes from Greg. We saved the order, and then picked the inventory later. We chose to use the remaining 12 pounds from our first lot, as it expires first and we want to use the FIFO method to reduce waste. That means we had to take the 3 remaining pounds from the harvest lot we just added in the earlier example. Also note how the Trace Number is included in the pick list, which makes it easy for us to track the tomatoes we sold to Greg back to that specific harvest they came from.
Reach out to us if you have any additional questions by submitting a ticket to the Farmbrite Customer Success Team.