Creating a crop type is the first step in the process of tracking your farm's crops in Farmbrite. You'll supply the crop type's details once, and Farmbrite will use them each time you plant this crop type in a grow location in the future. This basic set up process saves you repetitive data entry work, and allows your Farmbrite system to calculate future harvest dates and predict crop revenue. If you have many to add, you can also import your crop types from a spreadsheet if you find that easier.
Note: Be sure to complete your Account Settings before adding your crop types. This will allow you to choose Imperial or Metric measurements, and set your Hardiness Zone to calculate first and last frost dates. We can't stress this enough - to avoid future confusion, it is critical for you to choose your measurement system before adding your crop types.
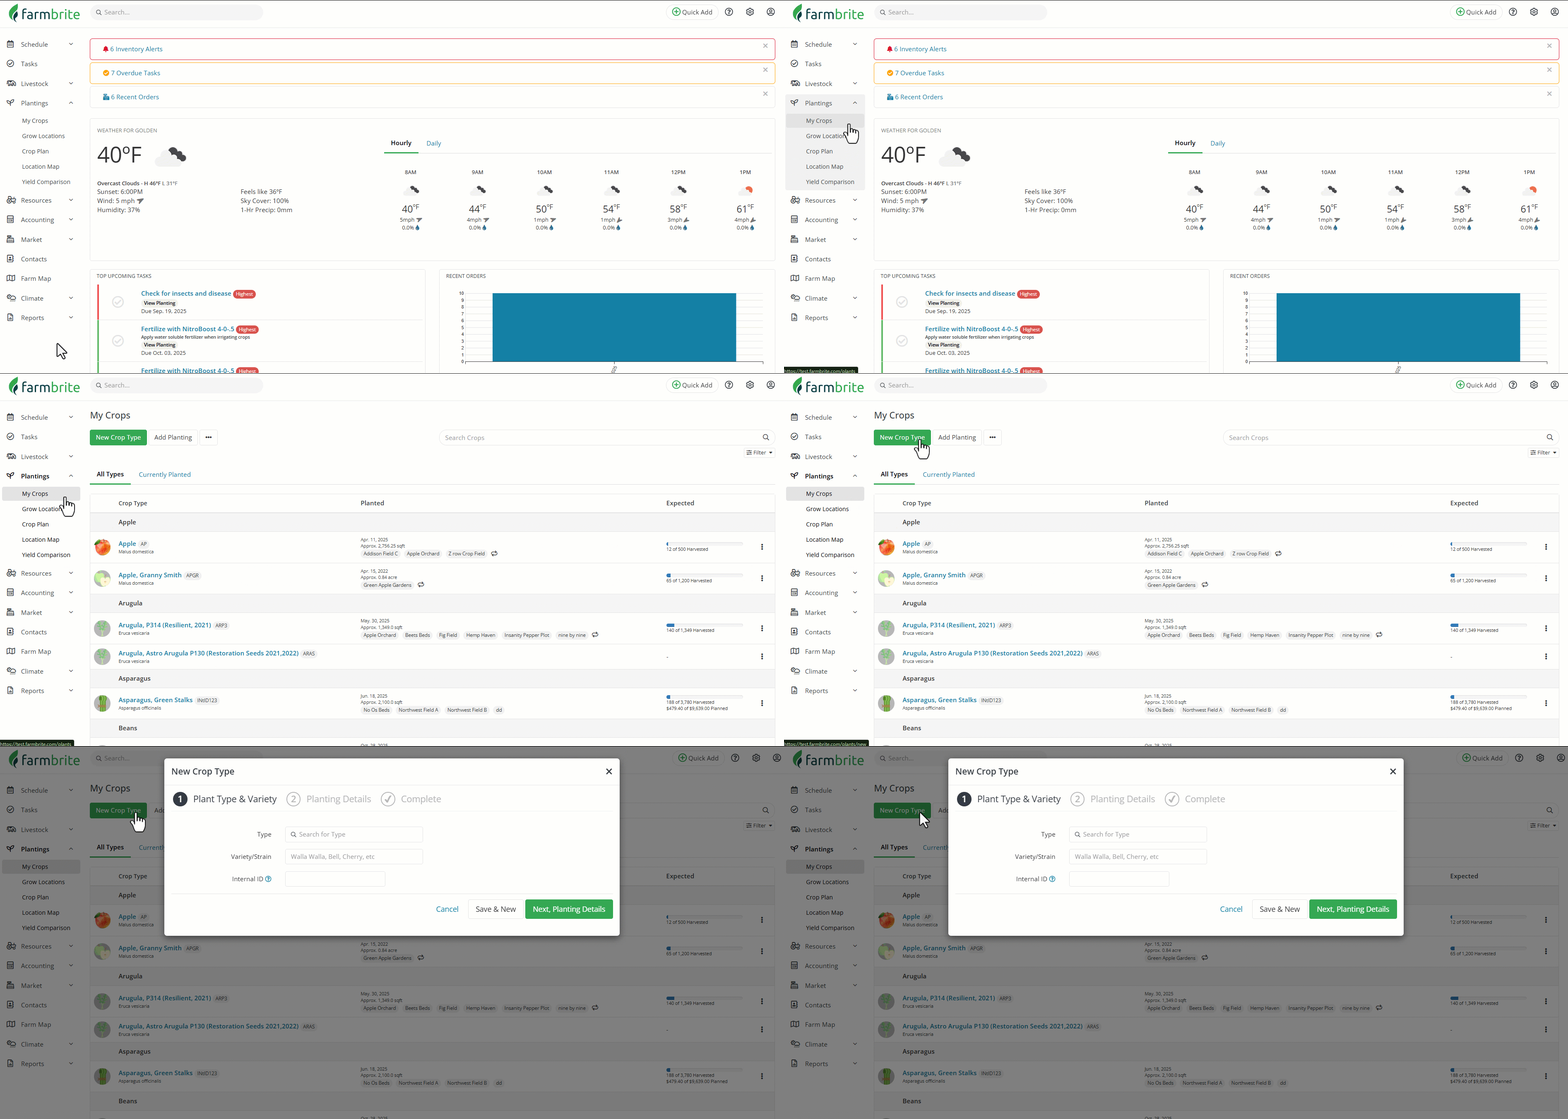
To add a new crop type, navigate to Crops from the left menu. You'll be defaulted to the My Crops page; click the New Crop Type button to get started. A new window will open - you'll see the steps in this process highlighted along the top.

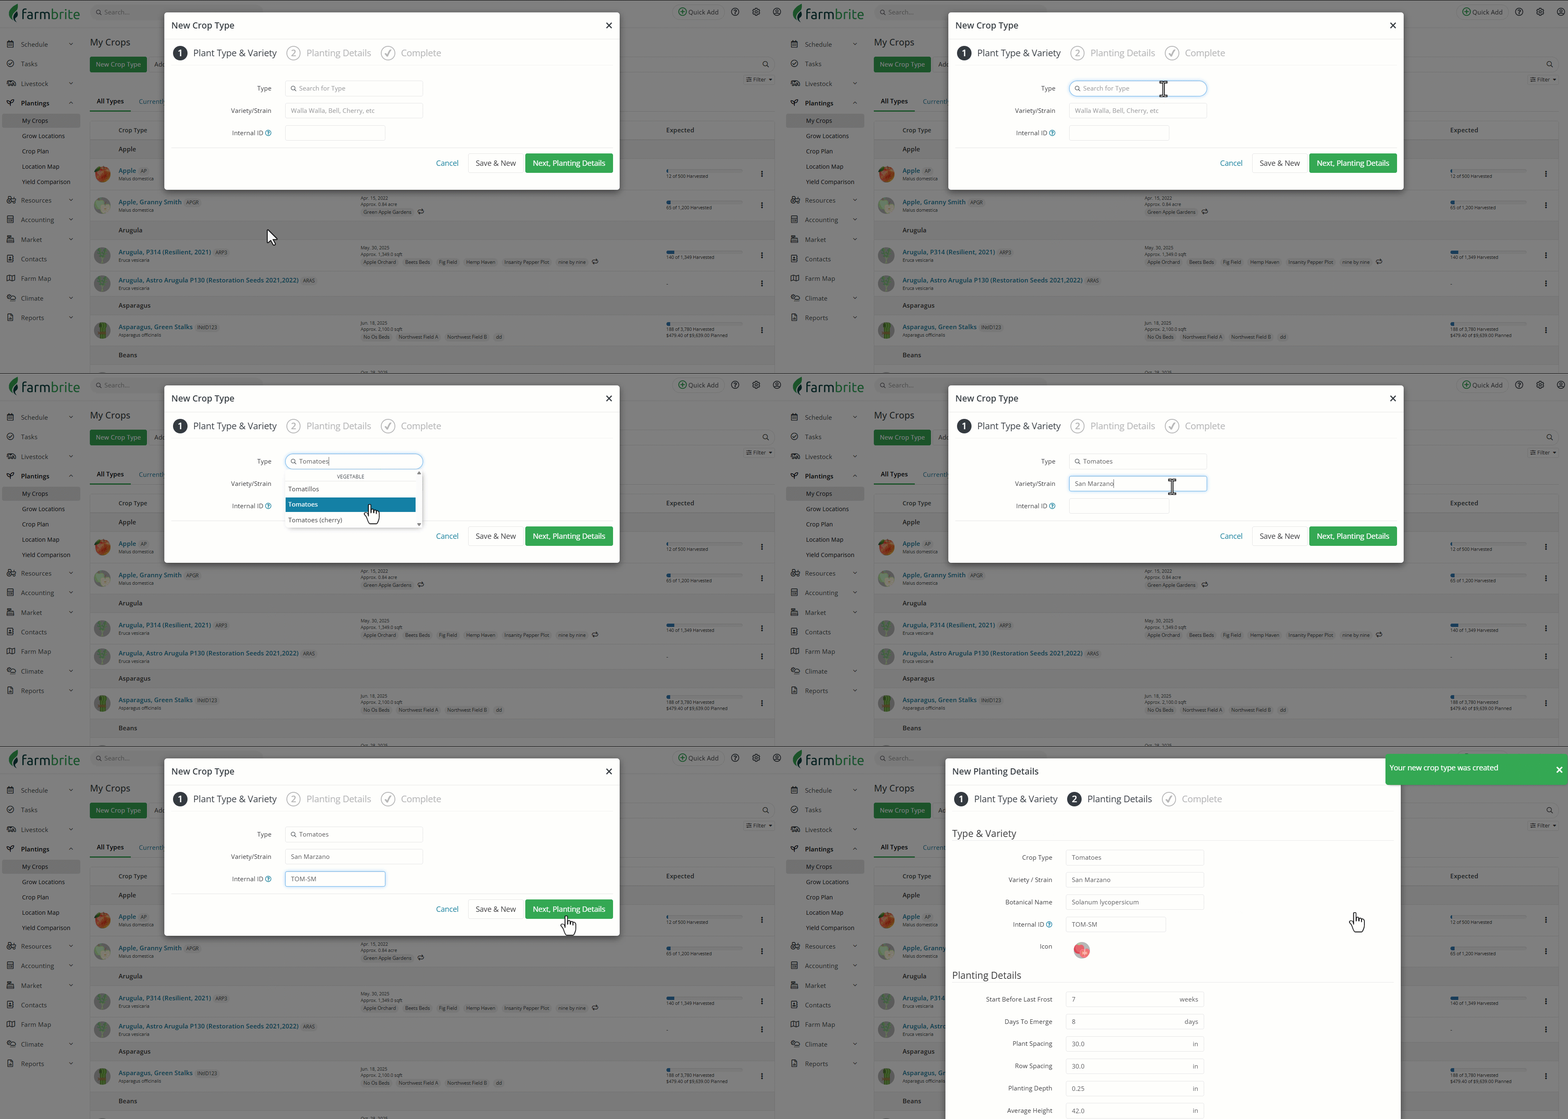
In Step 1, you'll add Plant Type and Variety information for the crop.
- Type - This is a search box to find pre-loaded crop types. Start typing the name of your crop (ex. Tomatoes, Peppers, etc.) and Farmbrite will suggest selections from our crop dictionary. Select your crop type from the list. Don't worry if you don't see what you are looking for; you can create custom crops outside of the list by simply typing whatever you need into the field.
- Variety/Strain - Provide information about the variety or strain of this crop. In our example below, we're identifying our tomatoes as the San Marzano variety.
- Internal ID - If you have an identifying number for this crop, you can supply it here. If you do not have one, feel free to leave this blank, as Farmbrite will automatically generate one for you.

Click the Next, Planting Details button to move on to Step 2. Alternatively, you could click Save & New to save this crop type without adding more details, and create your next crop type immediately.
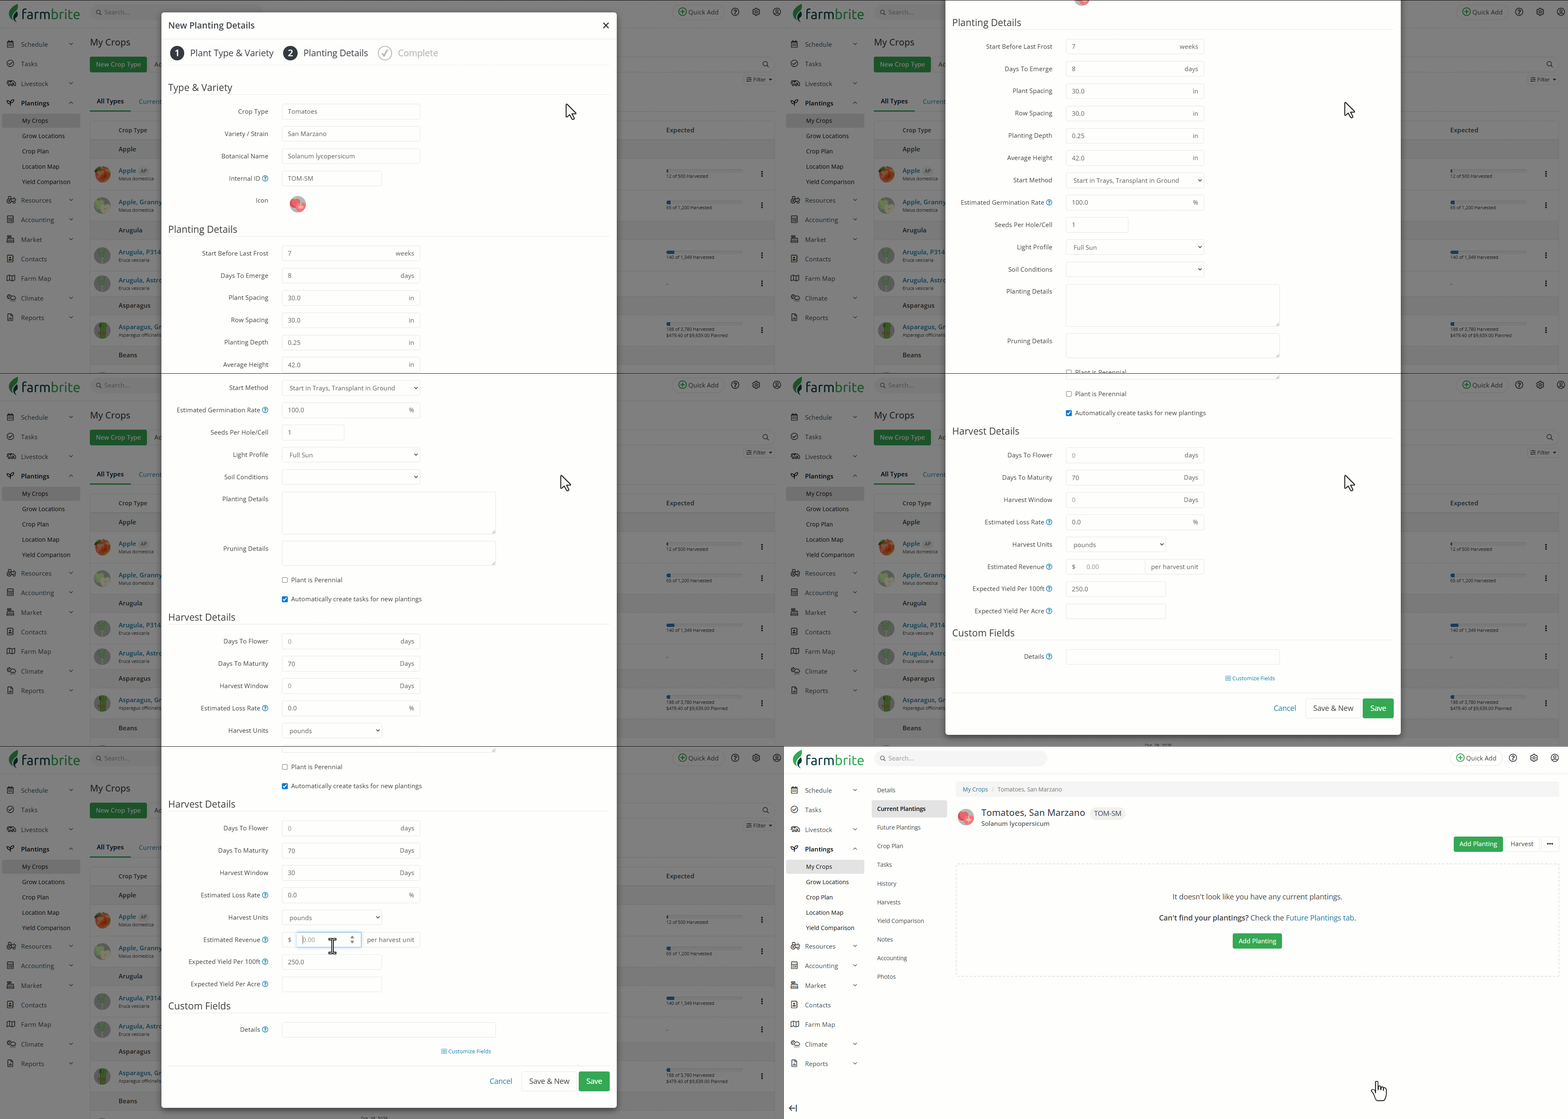
In Step 2, you'll add or edit planting and harvest details about the crop type. If you picked a crop type that was from Farmbrite's standard dictionary definitions, you'll see that much of the data is preloaded for you. These are common seed packet details for this crop type, but feel free to edit them for your unique geographic location.
You'll immediately see the information you provided in Step 1 at the top within the Type and Variety section. Note the preloaded Botanical Name and Crop Icon. This icon is used for at-a-glance identification of your crops throughout Farmbrite. You'll then supply your Planting Details.
- Start Before Last Frost - How many weeks should you start this crop type's seedlings before the last frost of the season?
- Days to Emerge - How many days will it take for your planted seedlings to germinate?
- Plant Spacing - How much space should you leave between plants within a row? This will be used to calculate plant counts in a field once you create a planting record for this crop type.
- Row Spacing - How much space should be left between rows of this crop type? Like Plant Spacing above, this will also be used to calculate plant counts in a field.
- Planting Depth - How deep should the seedlings be planted?
- Light Profile - What are the light requirements for this crop type? From full sun to full shade and anything in between, select what works best for this crop type.
- Soil Conditions - What soil type does this crop type grow best in?
- Planting Details - Add any additional details you'd like associated with this crop type. Maybe some helpful tips you've learned through trial and error experimentation, like our PH and humidity information in the screenshot.
- Pruning Details - Add any details about how this new crop type should be pruned.
- Attributes - Is this crop type a perennial? Marking it as a perennial will allow you to create a perpetual planting that will be automatically retained season after season. Then, choose if you will you sow this crop type directly into a grow location or start it indoors? If sown directly, you'll bypass questions about germination trays when creating the planting for this crop type.
Next, you will add your Harvest Details.
- Days to Flower - If relevant to this crop type, add the number of days from the planting date that you might expect to start seeing flowers on this crop. This might help you track extra details for your fruiting perennial plantings.
- Days to Maturity - The days to maturity is the average number of days from seeding date to harvest, within a specific crop group. If this is a transplanted crop, it is the average number of days from transplant date. Not sure if crop is direct-seeded or transplanted? Check the Growing Information on your seed packet for details. If a crop can be both direct-seeded or transplanted, days to maturity refers to direct seeding date. The days to maturity is calculated from seeding date. Note: Clicking add tasks to calendar will add these important dates to your tasks. You will find this button at the bottom left hand side of the screen when adding a new planting of your crop.
- Harvest Window - What's the sweet spot for harvesting this crop type after it has reached maturity? This will be used in your crop plan to guide you on the ideal time to harvest.
- Harvest Units - How do you measure your yield from this crop type - pounds, kilograms, bushels, etc.
- Estimated Revenue Per Unit - How much will you earn from each harvest unit selected above? This will be used to calculate your estimated total revenue from plantings for this crop type.
- Expected Yield Per 100' - If you expect to plant this crop type in standard 100 foot rows, how much yield do you expect for each row?
If you need to track more information than the standard fields outlined above, you can create custom fields for your crop types to keep records of any characteristics and data points that you need. Note: Custom fields are available with Farmbrite's Plus and Premium subscriptions.
After providing any of this information, click Save to save this crop type and return to the crops homepage, or Save & New to save this crop type and immediately create another one.

Your new crop type will be saved, and you can use it for new plantings going forward. But before you create that planting record, you'll want to be sure you have created grow locations to plant it in! Check out this article for more information on creating grow locations.
Also, now that you have a crop type created, if you need to make others that are similar, you can duplicate the crop type from it's actions menu.
