Outlining your fields, beds, enclosures, and buildings is a great way to see an overview of your property. Many Farmbrite users enjoy this feature, as it provides an opportunity to look at your property from a different vantage point, sparking new ideas for field and crop layout which may lead to improved efficiencies in land use. Beyond giving you a bird's eye view, mapping your farm will also enable automatic calculations of estimated plant counts, which then factors into your estimated harvest revenue.
Important Note: Farm mapping is available in Farmbrite's browser based experience (using a computer, not a tablet or phone). You can view your map on your mobile devices, but outlining your fields, beds, buildings, and more is best accomplished on a desktop or laptop.
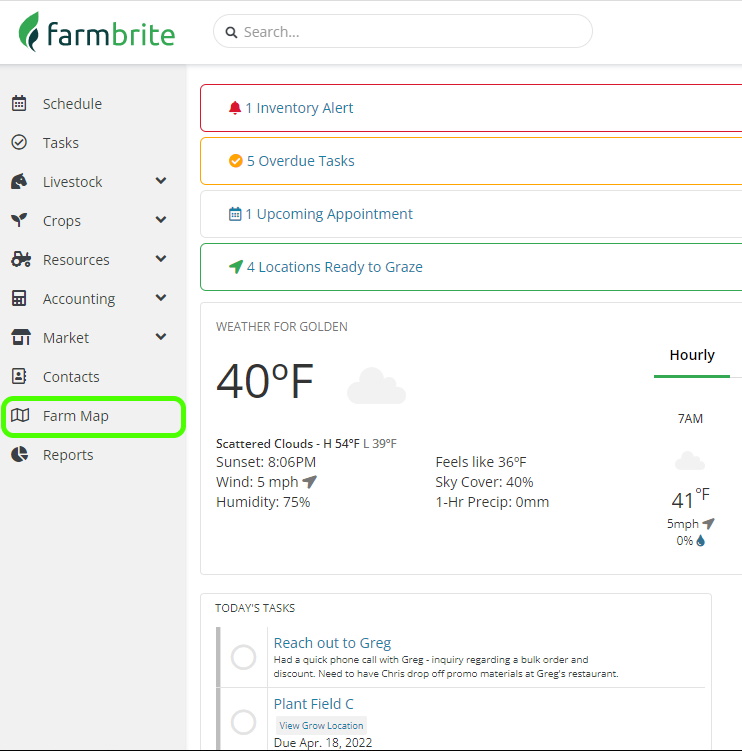
To start mapping your farm, navigate to Farm Map in your left navigation menu.

You'll immediately see an aerial satellite view of your property. This map is shown based on the address you gave when creating your Farmbrite account; if you need to update it to point somewhere else, you can change it in your Account Settings.

The map displayed in your account will probably look familiar, as the image is sourced from Google Maps. You can zoom using the plus and minus buttons in the bottom right, or use your mouse scroll wheel. You can also grab the map to move it around and change the area you are viewing.
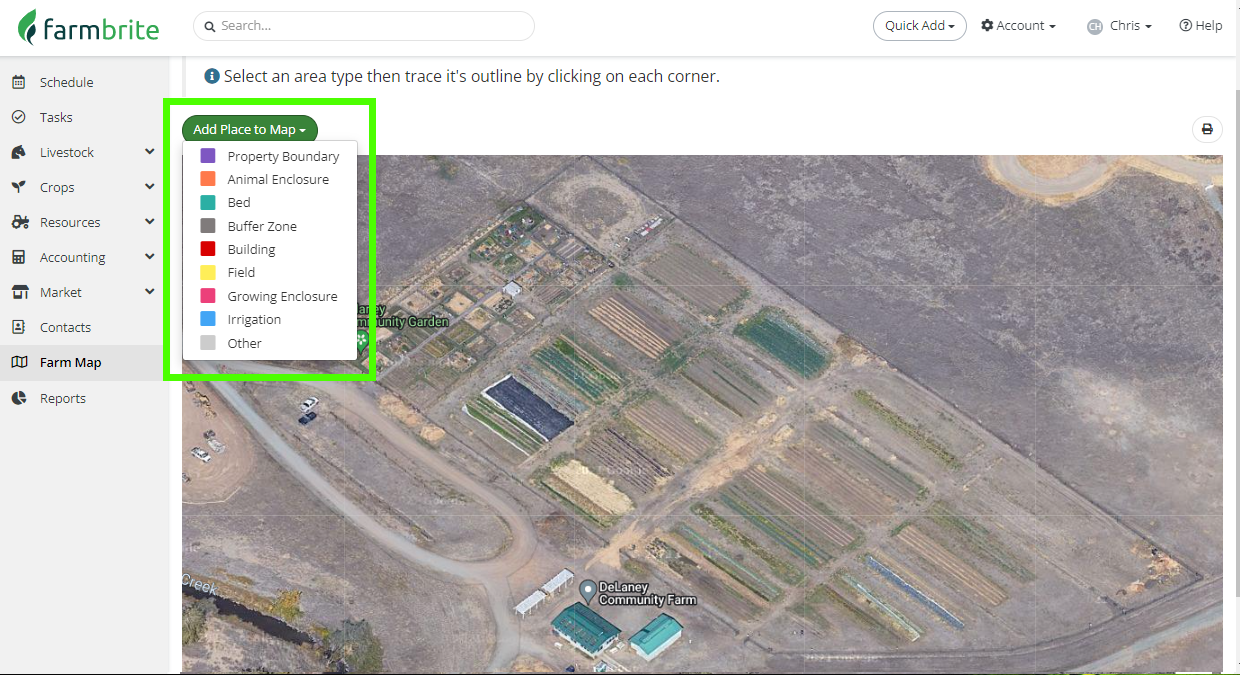
You'll also see a button at the top for you to add a place to your map. Click it, and you'll be given a choice to create different types of areas around your property - boundaries, fields, beds, irrigation and buffer zones, as well as buildings and storage locations, and enclosures for animals and crops. You can even map hazards if you need to look out for rocks, ditches, or uneven land.

Many users start by mapping their property boundary, but the order which you add your areas is entirely up to you.
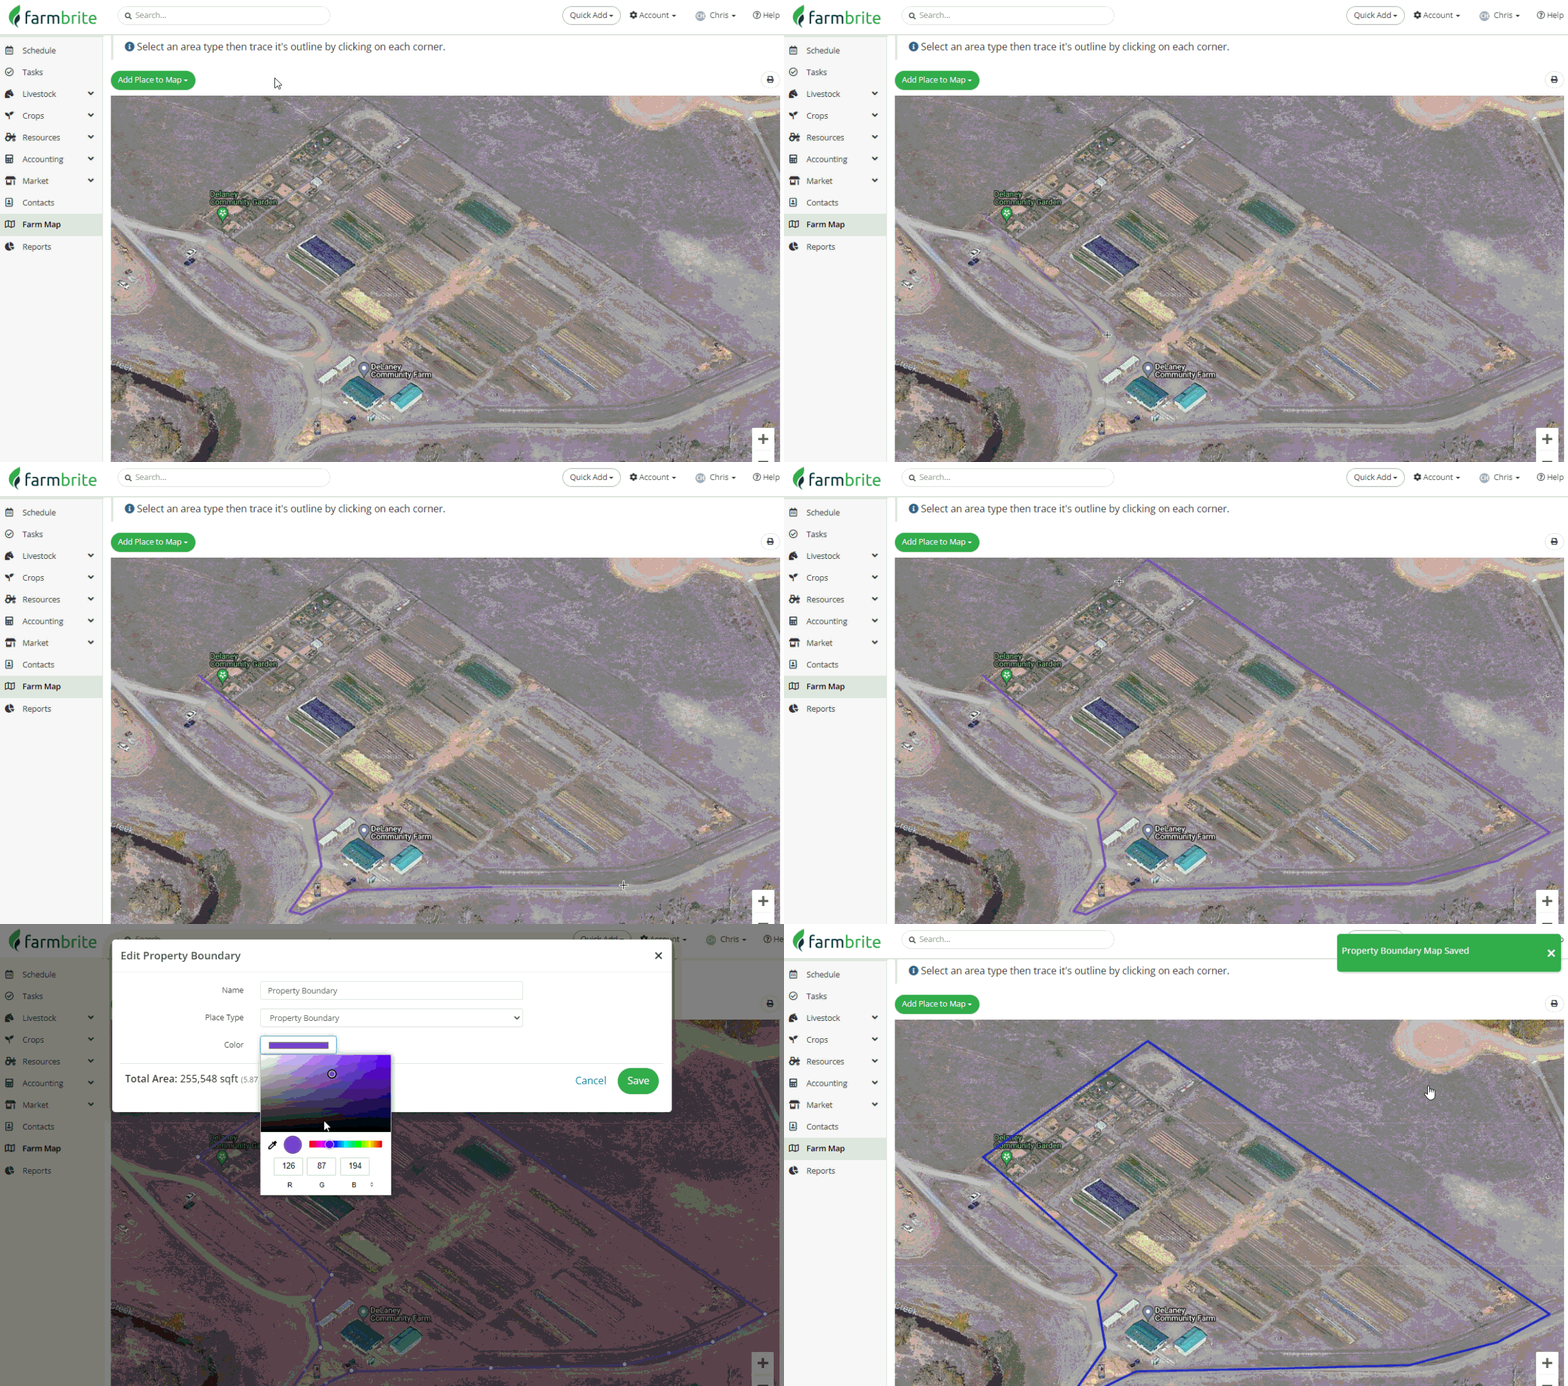
To start mapping your first area, select the Place Type from the button above the map. Your mouse pointer will change to crosshairs; find your first point and click. You can then trace the outline of the area by setting additional points. Connect your last point back to you first, and Farmbrite will create the area. You can then click to Edit Details, letting you change the name of this area, or set a different color for it's outline. Automatic measurements on map will provide information about the calculated square footage and acreage will also be displayed (or square meters and hectares if you're using metric measurements.) Be aware that your work is automatically saved when you create an area; there is no save button used on this page.

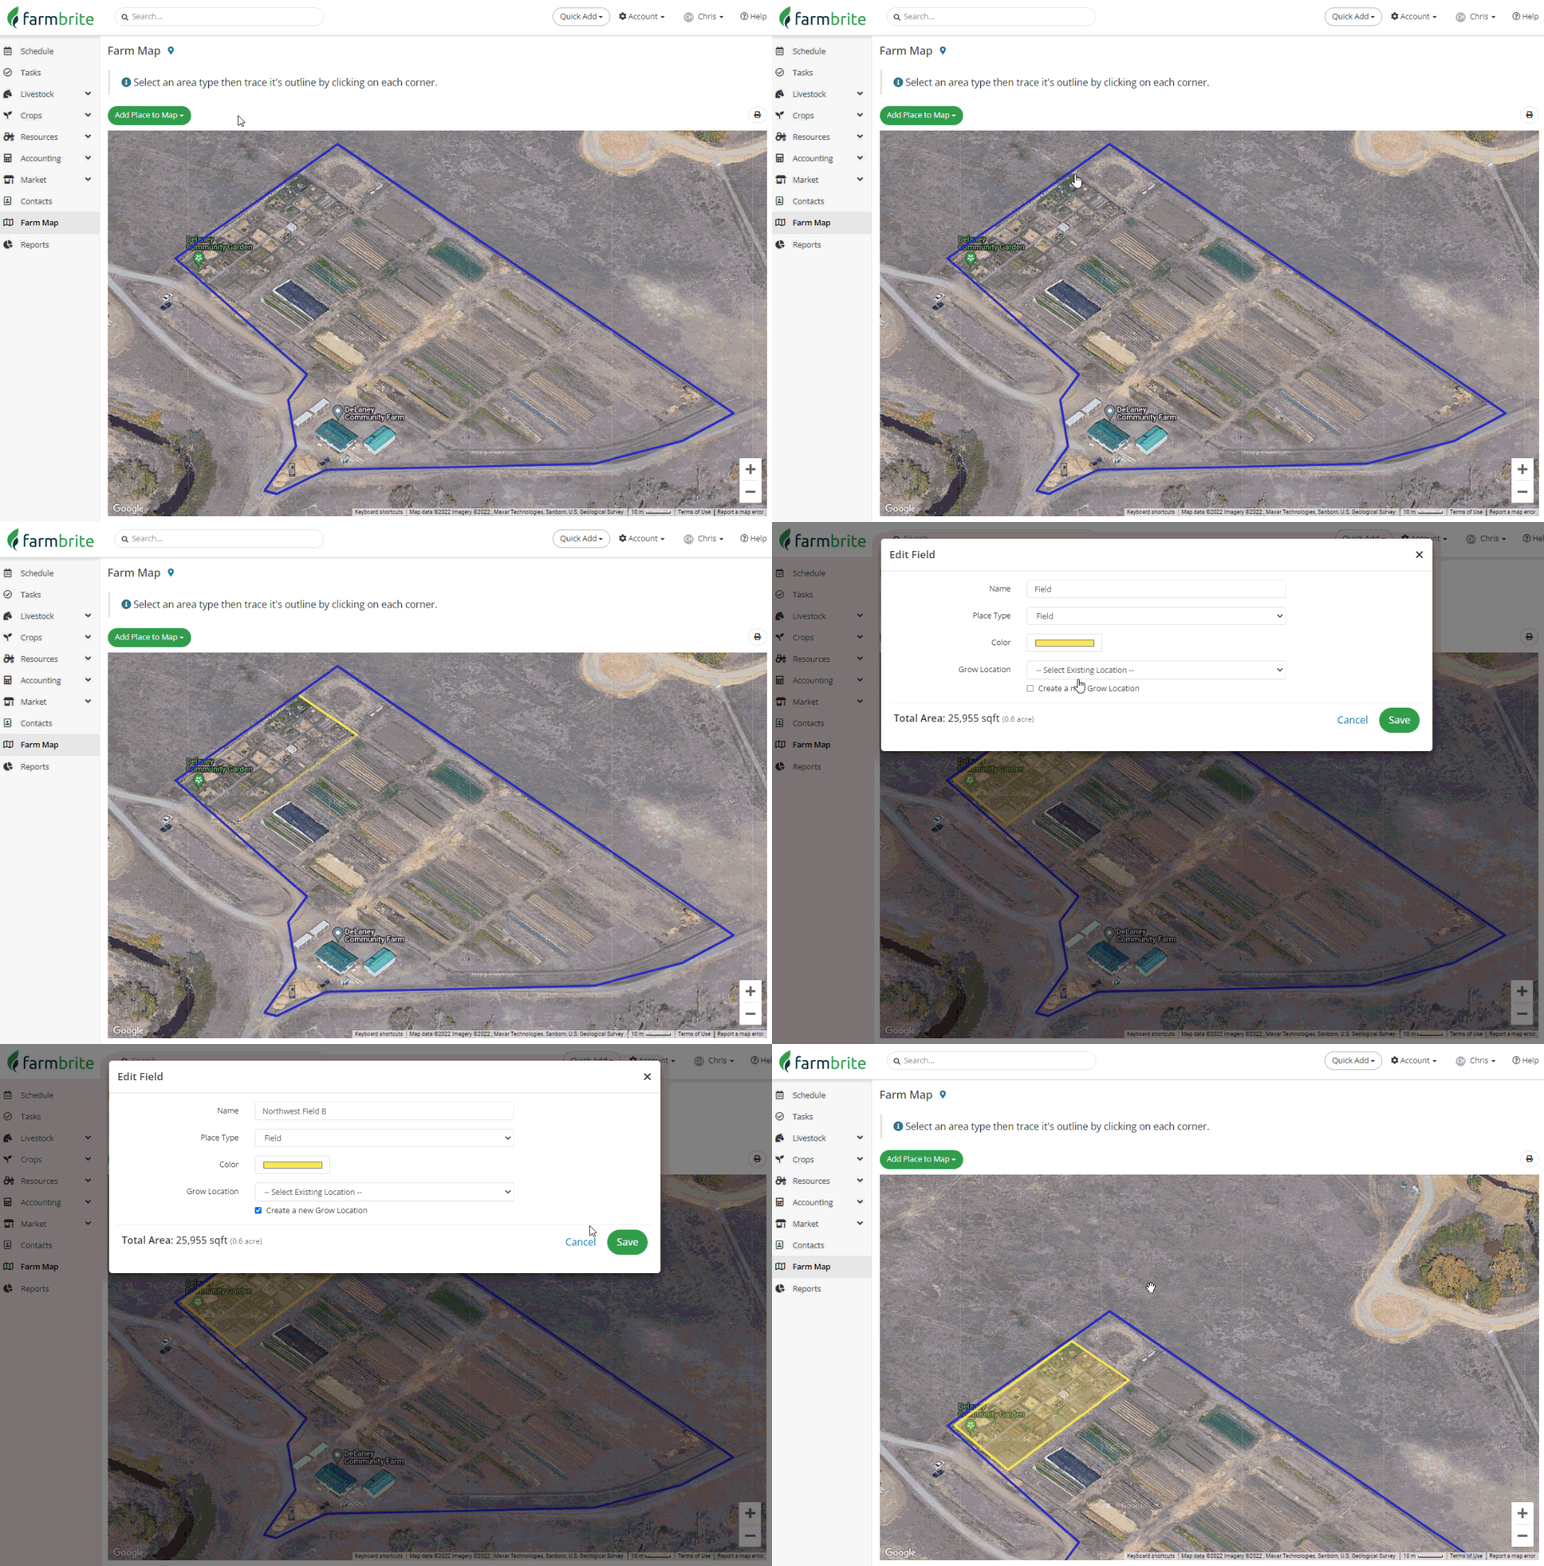
Now that we have a property boundary defined in the example above, we can continue to add other areas to our map using the same method. Let's map a field next! Select the Field from your Add Place button, and then plot your points and connect them to form the shape of your field.

See that Farmbrite will prompt you to name the field, and optionally associate it with a Grow Location. You'll use these Grow Locations to plant and keep track of your crops. Farmbrite will also automatically measure on map to calculate the area of the shape you've drawn on the farm map. If you have not created them under your Crops menu yet, you can create them as you map your fields by clicking the box to "Create a new Grow Location". Also note the Total Area calculation displayed in the window. This can be used to calculate plant counts and estimate crop revenue when planting crops in this Grow Location. Click Save to create the field. You'll also be asked to map Grow Locations when creating areas for Beds and Grow Enclosures. Note that associating a Grow Location is optional though; if this field will be used for livestock grazing without planting a cover crop, you may disregard this selection.
While we've shown you basic shapes for your fields so far, note that you can create any shape you need - even round, for pivot irrigation. You can plot as many individual points as you'd like for any specific area, so you trace a circle by creating many individual points.

We also know you might not get that circle perfect on the first try - you can see a few mistakes in our examples above. If you need to make edits to your area mapping, you can click on it, and choose Resize or Move.

Move the point to make adjustments, and if you make a mistake, click the arrow to undo your last change.

When you're done with your edits, simply click somewhere outside of the Area on the map to save your changes.
We know you'll be a pro at using this mapping tool in no time! Go ahead and add a few fields, outline your farm buildings, define your animal enclosures - all of the Area Types that you can use work in the same way as we've shown you for fields here. We've also compiled some Frequently Asked Questions/Tips and Tricks below; check them out, and let us know if you have any additional questions about mapping your farm.
FAQs
How can I map my farm if I have multiple locations that are not immediately connected or adjacent to each other?
You can zoom out as farm as you'd like on your farm map, and create areas wherever you need to. Whether it's down the street or the next town over, just zoom out, find your additional property, and start mapping there. Any field you map, regardless of location, can still be used as a grow location when planting your crops.
My farm looks different from when this map image was taken, can you update the picture for me?
We'd love to be able to do that, but Farmbrite is reliant on Google Maps data for these farm maps. We find that Google updates these images from time to time when they take new satellite photos, but we cannot request or provide new images. Check back on it every few months though, as Google Maps is routinely updated.
What's a buffer zone and how do I use that Area Type?
If you're farming organically, you likely need to leave buffer zones between you crop and your neighbors fields to ensure no cross contamination occurs. You might leave 10 feet on all sides of the field - if you'd like to call that out on the map, use the buffer zone Area Type to make sure that you don't mistakenly take that area into account when calculating acreage of your fields.
How can I fix my map labels so they can be more easily read?
If you have fields that are oriented north-south, you might want to select the option to Rotate Label Vertically . This writes the label text vertically and makes it easier to read when beds and fields are placed closely next to each other.
